


Learn how to build a custom live calculator in Webflow without expensive plugins. Sydney web developer Derek Siu breaks down using native forms, custom element attributes, and AI-generated JavaScript to create interactive user tools in minutes.
Adding a custom calculator—such as a pricing estimator, an ROI engine, or a tax tool—is one of the best ways to increase engagement, capture leads, and provide interactive value on a client's website. Historically, building these required hiring a back-end developer or paying for rigid third-party plugin subscriptions.
In this intermediate-to-advanced Webflow tutorial, Sydney-based web designer and developer Derek Siu shows you how to bypass complex programming obstacles entirely. By combining native Webflow forms, custom HTML5 attributes, and generative AI (Google Gemini), you can build a fully responsive, functional, and automated calculator directly inside Webflow in minutes.
Rather than writing hundreds of lines of complex math structures from scratch, this method relies on a seamless workflow handoff:
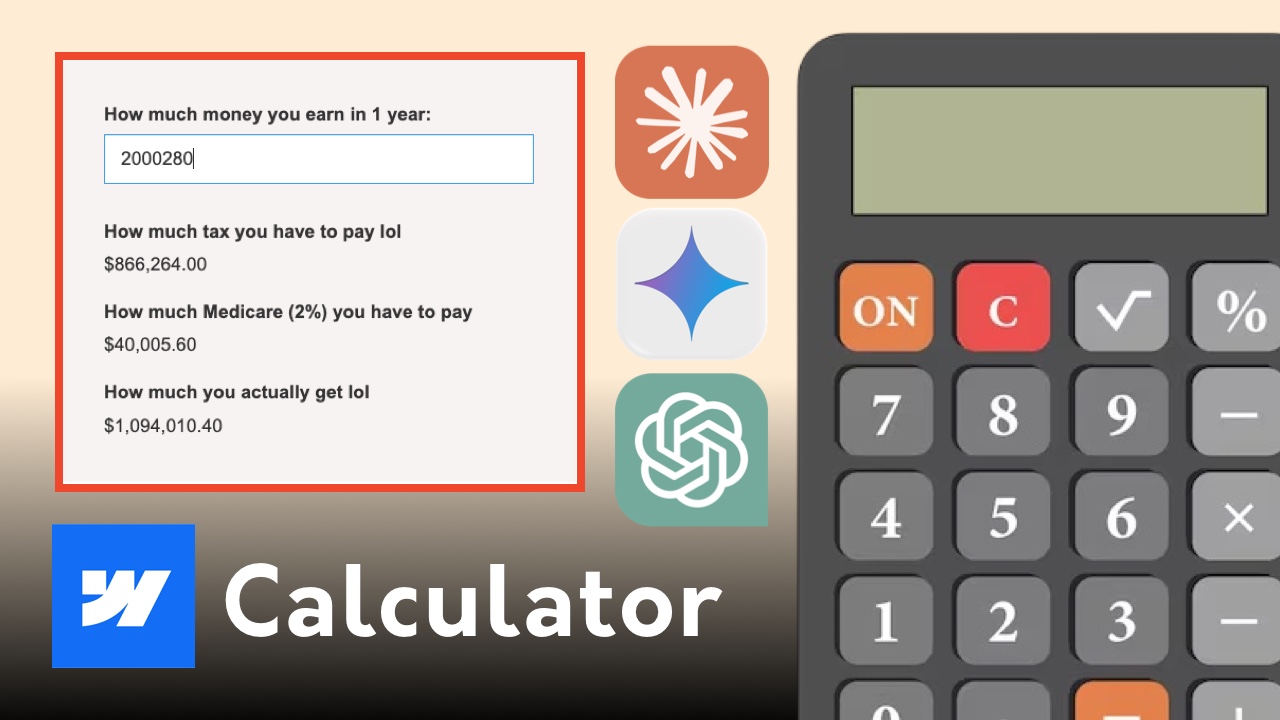
To demonstrate how this works under the hood, we are building a fully automated Australian Bracket Tax Calculator complete with a live 2% Medicare Levy calculation and dynamic net take-home pay tracking.
Start by placing a standard Form Block onto your Webflow canvas. Because this engine recalculates values completely live on the fly as the user types, you can actually delete the native Submit button entirely from the wrapper.
$0)$0)$0)Design Tip: To avoid unstyled layout shifts when your page first loads, manually set the placeholder text strings inside your Webflow elements to $0 by default before publishing.
Once your visual structure is established, take a screenshot of the specific mathematical rules or bracketing charts you need to replicate. Open your chosen AI chat platform (such as Google Gemini), paste the reference image, and supply a clear structural prompt:
The Prompt Framework:
"In Webflow, I want to build a functional live calculator using Webflow forms that determines how much tax a user has to pay based on this bracket screenshot. The user will input their annual income. Generate a clean JavaScript script that calculates these values live using Webflow custom attributes. Make sure the outputs display as clean text strings rather than input checkboxes."
The engine will instantly cross-reference your structural chart and generate an optimized script tailored around custom attributes.
To link your visual text layers to the newly generated AI code script, we use Webflow's native Custom Attributes panel located inside the element settings tab.
Every single interactive element on your form will share the exact same main attribute Name, but will utilize a unique distinguishing Value so the JavaScript file knows exactly what data it is pulling or overriding.
Select each element, hit the Plus (+) icon inside the Custom Attributes layout section, and map out the matching parameters according to your script variables.
With your layout elements mapped, copy the complete JavaScript code generated by the AI chatbot.
Go to your page panel, open the Page Settings, and scroll down to the Custom Code section. Paste your complete script inside the Before </body> tag window wrapped cleanly in open and close script tags:
Hit Save, launch your project settings, and publish your site layout to see the real-time calculation logic take effect instantly across breakpoints.
As Derek points out during the live build, working with AI code generation requires a willingness to test and adjust parameters. During the initial preview, the calculation script initially rendered the Medicare Levy parameter as a checkbox option rather than an inline text string, causing a layout calculation mismatch on the final net total string.
If a value fails to update or your math calculations return broken properties on your live staging domain, do not stress or try to rewrite the script yourself. Simply tell the chatbot what went wrong using natural language:
"The script is working, but the grand total calculation isn't subtracting correctly. Rewrite the function so that the element matching [calcment="grand-total"] always equals the raw input income minus both the total-tax and the medicare-total attributes."
Copy the revised function block, update your page's body tag field, and republish to achieve an edge-to-edge calculation layout.
Mastering this dynamic combination of Webflow UI layout design and automated JavaScript generation completely changes what you can deliver to clients. Instead of losing hundreds of dollars on custom software engineering contractors, you can now build complex user acquisition tools, high-tier pricing selectors, and business estimation assets independently.
Ready to scale your visual development skills and unlock high-ticket freelance retainer options? Explore Derek Siu's premium Webflow Masterclass and Freelance Business Guides.
Watch the complete build process from scratch, look inside the custom code configurations, and see exactly how to debug script logic errors live in real time:
👉 Watch: Build a Webflow Calculator with AI in Minutes