


Learn how to build a smooth, responsive page scroll indicator in Webflow that visually shows users their scroll progress. This step-by-step tutorial covers setting up div blocks, styling, and animating a sticky progress bar to enhance user experience on any Webflow site.
Learn how to build a sleek and functional page scroll indicator in Webflow. This visual progress bar at the top of your screen shows users how far they have scrolled, enhancing user experience by giving clear feedback on page position.
Make sure your Webflow page has enough scrollable content such as text, images, or videos. The scroll indicator relies on scrollable length to work correctly, so add content if your page is empty or too short.
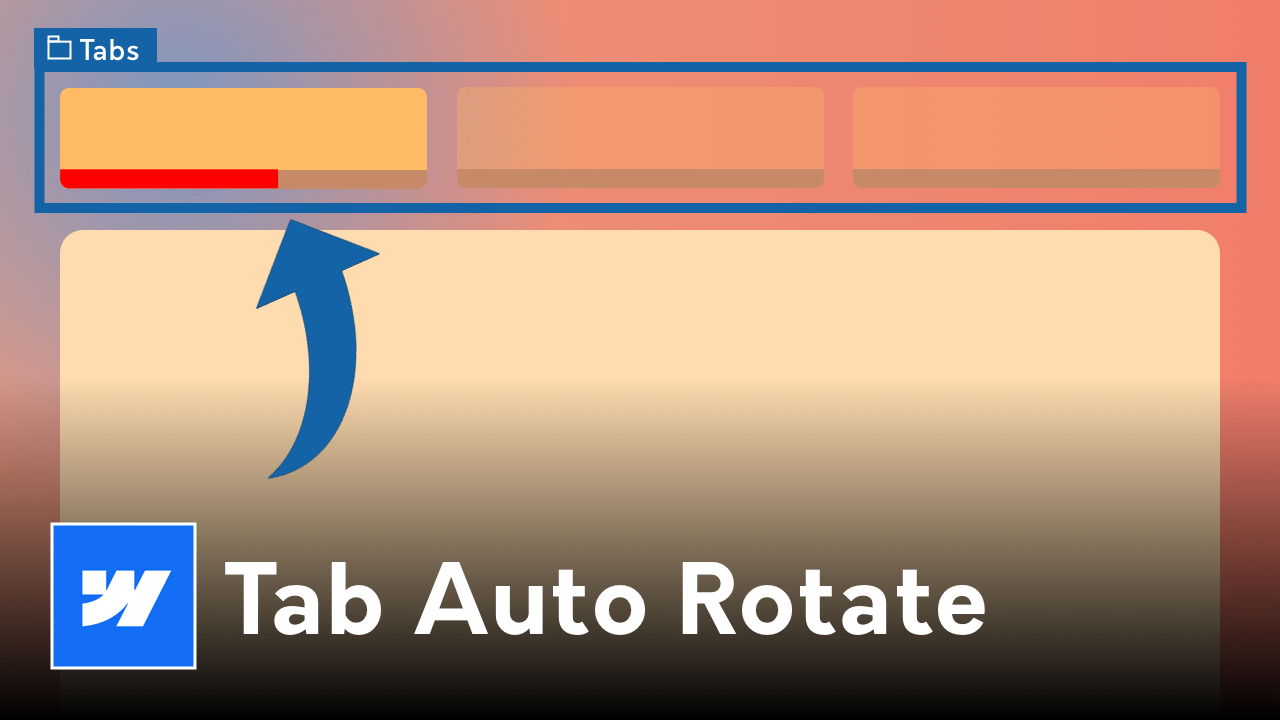
Open the Navigator panel by pressing the 'AZ' button or clicking the Navigator icon. Inside your page structure, add a new div block right at the very top under the body element. Name this div scroll-wrap. Set its width to 100% of its parent and give it a height around 30 pixels (you can make this thinner later to fit your design).
Inside scroll-wrap, add another div called bar-indicator. Set its width to 100% and height to 100%, so it fills the wrapper completely. Choose a standout color (like red) to make the scroll progress clearly visible.
Select the body element and open the Interactions panel. Choose the trigger While Scrolling in View and create a new scroll animation called page-indicator. Animate the width of the bar-indicator div from 0% at the top of the page to 100% at the bottom. This will visually track scroll progress.
Change the scroll-wrap div’s position setting from static to sticky with a top offset of 0 pixels. This makes the scroll bar stick to the top of the viewport, ensuring it remains visible as users scroll. Test the indicator on various devices to verify consistent behavior.
If the scroll bar fills prematurely when the page loads, adjust the animation’s start point to around 9-10%. This slight delay improves accuracy and avoids showing progress before actual scrolling.
The scroll indicator provides visual feedback to users by showing how far down the page they’ve scrolled, improving navigation clarity and user experience.
Ensure your page contains enough content like text, images, or videos. A scroll indicator needs a scrollable page to function properly.
Add a new div block at the top of the page under the body tag. Assign the class scroll-wrap, set width to 100%, and height to approximately 30px.
Inside scroll-wrap, add bar-indicator div. Set its width and height to 100% and assign a visible color, typically red, for the progress bar.
On the body element, create a "While Scrolling in View" interaction named page-indicator. Animate the width of bar-indicator from 0% to 100% based on scroll position.
Change the position of scroll-wrap to sticky and set the top offset to 0, so the bar stays fixed at the top while scrolling.
Adjust the animation’s start to around 9-10% to prevent the bar from filling too early on page load, ensuring more accurate scroll feedback.
Preview the scroll indicator on desktop and mobile to confirm smooth operation and responsiveness.
This scroll progress bar is a simple yet effective UX enhancement that guides visitors through your content. Use it as a foundation to build more engaging and interactive Webflow sites.
